

Wiring of Solar Powered Timer Controlled Motorized Valves
Connect the solar panel, timer control unit and motorized valve using the wiring instructions below. Set the desired ON/OFF times on the timer so the valve opens and closes automatically without manual intervention or an external power supply.
Wiring Connections
Connect the solar panel to the timer control unit and the motorized valve to the timer's output terminals as shown in the diagram.
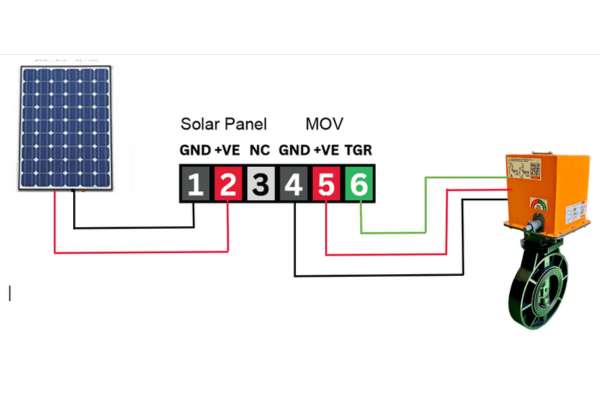
- Connect to the GND of the solar panel (black wire).
- Connect to the positive terminal of the solar panel (red wire).
- No connection required.
- Connect to the GND of the motorized valve (black wire).
- Connect to the positive terminal of the motorized valve (red wire).
- Connect to the trigger wire of the motorized valve (green wire).
Important: Avoid shorting the terminals or wires, as this may damage the battery.
Operation and Manual Override
- Do not alter the solar charge settings.
- Turn off the ON/OFF toggle switch when the system is not in use.
- To manually override the motorized valve, first switch off the output power from the panel.
Download the Installation Guide
Download Wiring of Solar Powered Timer Controlled Motorized Valves (PDF, English, 3.87 MB)
Updated April 13, 2025.